
Microsoft Excel is a popular tool relied upon by millions for organizing, managing, and analyzing data effectively. However, with great functionality comes the need for data security. Protecting your Excel workbook from unauthorized editing ensures the integrity and privacy of your data while unlocking it at the right time allows for seamless collaboration.
In this guide, we’ll walk you through how to protect and unlock an Excel workbook, discuss advanced security features, and share best practices for workbook security.
Why Protect an Excel Workbook
With the increasing importance of data security, safeguarding sensitive information within your Excel workbooks has become essential. Here are some common scenarios where Excel workbook protection is essential:
- Collaboration: Prevent unauthorized edits when sharing files with team members.
- Confidentiality: Protect sensitive financial or personal data.
- Data Integrity: Avoid accidental changes to important formulas or data.
Excel provides tools to lock your workbook or worksheet, ensuring only authorized users can make changes.
How to Protect an Excel Workbook From Editing
One of the easiest ways to secure your data is by password-protecting your Excel workbook. Follow these steps:
- Open Your Workbook: Launch Excel and open the file you want to protect.

- Navigate to the “Review” Tab: Click on the “Review” tab in the toolbar.

- Protect the Workbook: Select “Protect Workbook” from the options. Choose whether to protect the workbook structure or windows.

- Set a Password: Enter a strong password that is hard to guess but easy to remember. Confirm the password when prompted.
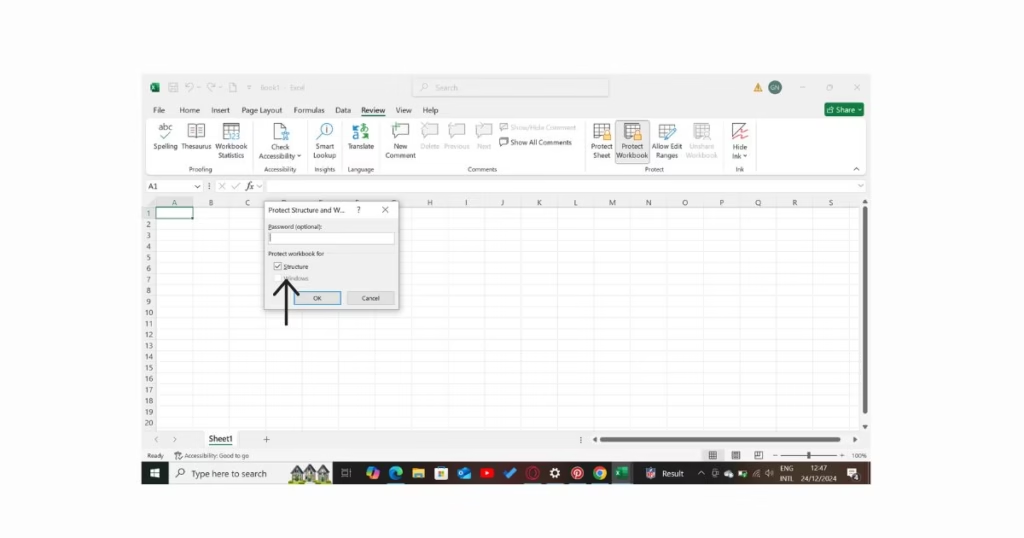
- Save Your Workbook: Save the workbook to apply the protection.
Tips:
- To create a strong password, combine uppercase and lowercase letters, numbers, and symbols.
- Storing your passwords securely, such as in a trusted password manager, is also recommended.
Protecting Specific Worksheets in Excel
Sometimes, you might want to lock only certain parts of your workbook. Excel allows you to protect individual worksheets while leaving others editable.
Steps to Protect a Worksheet:
- Select the worksheet you want to protect.
- Navigate to the “Review” tab and click “Protect Sheet.”

- Set permissions for users, such as allowing them to format or select locked cells.
- Enter a password to lock the sheet and confirm it.
- Save the workbook to apply changes.
Use Cases:
- Protect formulas in Excel sheets while allowing data entry in other areas.
- Restrict access to confidential data while enabling collaboration on non-sensitive parts of the workbook.
How to Unlock an Excel Workbook or Worksheet
Unlocking a workbook or worksheet is straightforward if you have the password.
Steps to Unlock:
- When you’re ready to protect your workbook, open it and go to the “Review” tab in the Excel ribbon. From there, you can access tools to lock or safeguard your file against unauthorized edits.
- Click “Unprotect Workbook” or “Unprotect Sheet,” depending on your needs.
- Enter the password when prompted, and click “OK.”
Troubleshooting Tips:
- If you forget the password, you may need to use password recovery tools or contact IT support.
- Always back up your workbook before making any changes.
Advanced Protection Features in Excel
Excel offers additional security options for users who need more robust protection:
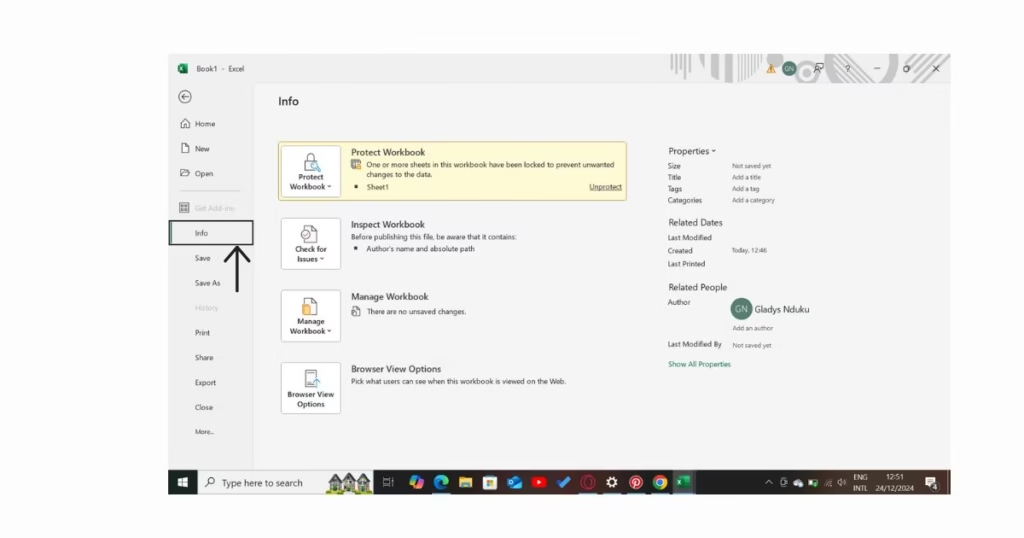
- Encrypting the Entire Workbook:
- Go to “File” > “Info” > “Protect Workbook” > “Encrypt with Password.”
- Set a password to encrypt the entire file.


- Restricting File Access:
- Use the “File” > “Protect Workbook” > “Restrict Access” feature to allow only certain users to open or edit the file.
- Sharing Protected Files Securely:
- Share the protected file via secure platforms, ensuring only authorized recipients have access.
Best Practices for Workbook Security
To maximize the security of your Excel files, follow these best practices:
- Back-Up Your Workbook: Always save a backup copy before applying protection.
- Use a Password Manager: Store passwords securely in a password manager to avoid losing them.
- Educate Team Members: Train team members on handling protected workbooks to prevent accidental modifications or breaches.
- Update Regularly: Regularly update your file permissions and passwords.
Hands-On Practice: Test Your Skills
To ensure you’ve mastered workbook protection and unlocking, try these exercises:
- Create a sample Excel workbook with multiple sheets.
- Protect the entire workbook with a password.
- Protect specific sheets within the workbook.
- Unlock the workbook and sheets to make edits.
FAQs
Protecting a Workbook: Prevents structural changes, like adding, deleting, or renaming sheets.
Protecting a Worksheet: Restricts editing within a specific sheet, like modifying data or formulas.
Go to File > Info > Protect Workbook > Encrypt with Password and set a password. Make sure to save it securely.
Yes. Unlock all cells first (Format Cells > Protection > Unlock) and then select specific cells to protect before enabling sheet protection.
If you forget the password, there’s no official way to recover it. You may need to use third-party password recovery tools or a backup copy of your file.
When protecting the sheet, set permissions to allow selecting locked or unlocked cells but restrict other actions like editing or formatting.
Yes. Go to File > Info > Protect Workbook > Encrypt with Password to encrypt the entire file.
Navigate to Review > Unprotect Workbook or Unprotect Sheet and enter the password, if set.
Conclusion
Protecting and unlocking Excel workbooks is a vital skill for anyone working with sensitive or shared data. Whether you need to secure your files from unauthorized edits or share them securely with colleagues, Excel’s tools make it easy to manage permissions and safeguard your information. By following the steps and best practices outlined in this guide, you can ensure your workbooks remain secure while maintaining their usability.